Showing posts with label diy. Show all posts

March 22, 2012

Make This: Springtime Wreath


I made this springtime wreath a month or two ago when I decided we weren't really going to have a winter. Super simple and easy project to dress up any bland white door.

You will need:
  • styrofoam ring
  • yarn
  • ribbon
  • fun flower
  • glue
Start off by tying your yarn around the styrofoam ring to attach it. Glue the yarn down so it doesn't move around. Then just start wrapping and wrapping the yarn around until the ring is completely covered. Make sure you're pulling it so it's snug as you go. Once your right is covered tie off and glue down the ending knot. I made this part the top of mine. Cut the stem off of your flower and glue it to the wreath. Cut a piece of ribbon to a desired length and attach it to the yarn covered ring. Glue it so the ribbon doesn't shift around. Hang it!

I caught my craft store at a good time when the yarn and flower was on sale. I think it cost me around $10 total with plenty of yarn to spare.

January 4, 2012

January Project: Living Room Makeover

January is going to be the month where I redo my living room! I found a new TV stand and computer desk I want, I think that's what kicked me into gear. Plus, I found this great photo on Pinterest that really sparked my brain.
I think I found my color palette as I was doing this. I really like the combination of the avacado-lime green, grapefruit pink, and vintage sky blue. Yes? Yes. It's so refreshing! I like dark furniture and like every other apartment my walls and carpet are neutral so I think the colors will definitely pop.

I think my goal is to do the living room in a bargin hunting way. (Who doesn't have that goal?) But I really want to find some great accessories at some antique thrift stores.

Good storage solutions will be a must as well. My crap right now is just a huge hodge-podge of craft supplies, papers (papers...and more papers...), and cords. I am coming to terms with my OCD-ness of things not looking aesthetically please. I hate when things look like a big pile of junk. I want my place to not look like a college dorm room. Must find attractive ways to display things.

Alright, I have my inspiration and my goals. Now all I need is to spend some time at work making a paycheck...or two...or three.

Ready. Set. Go!


December 27, 2011

Sew, Sew, Sew


My Ma got me a sewing machine for Christmas and a late birthday present. I'm so (not a pun, I swear) excited! When I was little she taught me how to sew but it's been years and years since I've done it. Now I can finally create the projects I've been wanting to do for quite some time now.


I'm going to attempt this pillow...right now. We will see how it goes!


December 20, 2011

A Very Charlie Brown Christmas Tree


It's my very own Charlie Brown Christmas Tree! I got this great little ornament from my boss that says 'Shine From the Inside Out' and I felt it deserved a tree. So I made one! It feels a bit more festive in my apartment now with the presents for the family wrapped and piled underneath. 

Now to do some baking...


December 19, 2011

DIY Feature @ Crafted Love


Are you still in need of a Christmas gift with a minimal budget? Check out my super easy DIY photo canvas over at Crafted Love. Check out the post here!


Dreaming of a White Christmas


This year I am literally dreaming of a white Christmas. It's so brown outside. How gorgeous are these winter wonderland photos? Definitely make me want to hear the crunch of a little snow under my shoes. And then if it wants to melt after New Years it can. I would be okay with that.


P.S. Did you check out my Easy Photo Canvas guest post over at Crafted Love today? If you're looking for a simple, fun gift idea check it out here! The best gifts are handmade gifts -- they come from the heart!

Images from Pinterest


November 8, 2011

Mondrian Inspired Art

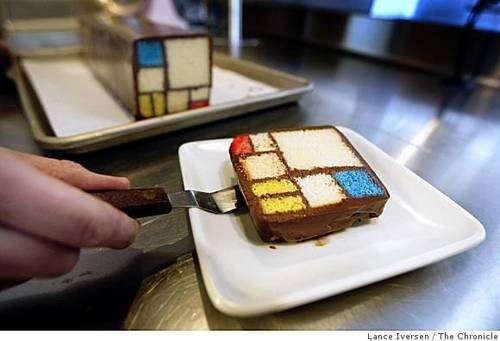
One by one I am making over the rooms in my apartment starting with my bedroom. It is getting the gray and yellow treatment. The walls were pretty blank so in trying to think of how to liven them up in a simple way. The Rooftop Coffee Bar in the San Francisco Museum of Modern Art that creates a cake inspired my Piet Mondrian's paintings.

How pretty right? I want to try my hand at making one. Anyways, it hit me that this was simple enough where I wouldn't have to deal with my lack of painting skills. So I made these:


My gray and yellow version of a Piet Mondrian piece of work. If you don't know who Mondrian is, he was a Dutch painter during the De Stijl art movement in the early to mid 1900's. De Stijl had a heavy focus on emphasis on abstraction and using just form and color.

My interior design tip: Pick up some canvas, paints, and a paintbrush. Then pull inspiration in from somewhere and get to work!

March 13, 2011

D.I.Y. Project: Jewelry Holder

I saw this on a blog awhile back but now I can't remember which one it was...It was a D.I.Y. project creating a jewelry holder out of an old picture frame.

I've been looking for a nice way to store my earrings without just having them tossed around in a little dish that they've been in for years. This definitely has been the best idea I've seen yet.


You will need: 
1 old picture frame (I got my frame at a thrift store for a dollar)
Thumbtacks
Picture hanging wire
Paints (optional)
Fabric
Tacky glue

What You Will Do: 
1. Paint your frame if desired. I watered down a black paint and a silver metallic paint. I first layered on the black paint and wiped it away giving it an aged look. I wasn't looking for it to be perfect so the natural wood still shows through in spots. I then did the same with the silver metallic. Let it dry. 
2. Cut out 3-4 stripes of picture hanging wire a few inches longer than the width of the frame.
3. Figure out how far apart you want your wires to be. On the backside of the frame, gently push in the thumbtacks in desired locations. But don't push in all the way. 
4. Wrap the ends of the wire around the tack. Make sure to pull tight so the wire isn't sagging. Repeat for rest of rows. 
5. Once all your wires are connected push in thumbtacks all the way to secure the wire. 
6. Cut out fabric enough to cover back of frame. 
7. Glue fabric to back of frame, making sure the right side is facing the wires.
8. Hang in desired location and arrange your jewelry on it. 

My finished holder.

I think I may add some nails to the bottom so I can hang the necklaces that I can't string on there as well as my bracelets. I also need to find a way to hang my non-dangly earrings on there. Haven't quite figured that one out yet. This adds some nice color to my stark white bathroom walls.

:)

Related Posts Plugin for WordPress, Blogger...